
1. Introduction
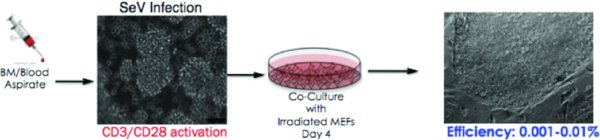
CytoTune™-iPS Reprogramming System uses vectors based on replication in competent Sendai virus (SeV) to safely and effectively deliver and express key genetic factors necessary for reprogramming somatic cells into iPSCs. In contrast to many available protocols, which rely on viral vectors that integrate into the genome of the host cell, the CytoTune™ Reprogramming System uses vectors that are non-integrating and remain in the cytoplasm (i.e., they are zero-footprint). In addition, the host cell can be cleared of the vectors and reprogramming factor genes by exploiting the cytoplasmic nature of SeV and the functional temperature sensitivity mutations introduced into the key viral proteins. The CytoTune™-iPS Reprogramming Kit contains four SeV-based reprogramming vectors, each capable of expressing one of the four Yamanaka factors (i.e., Oct4, Sox2, Klf4, and c-Myc) and are optimized for generating iPSCs from human somatic cells. The reprogramming vectors in this kit have been engineered to increase biological and environmental safety.
4. Media preparation
4.1. Instructions for processing reagents
-
Complete RPMI (cRPMI)
-
Supplement sterile RPMI-1640 medium with 10% sterile heat-inactivated FBS and 1% sterile
-
antibiotic/antimycotic. Store at 4°C.
5. Protocol
5.1. Processing of fresh PBMCs isolation
-
Collect blood via venipuncture directly into CPT tube(s).
-
Store CPT tube(s) at room temperature if they cannot be processed immediately; cell degradation will occur if tubes are stored for more than four hours.
-
Centrifuge CPT tube(s) at 1800 × g (approximately 2800 rpm on a Sorvall RT6000 centrifuge) for 20 minutes at room temperature. Be sure that the tubes are not loaded in the outer positions of the carriers, as this may cause the rubber tops of the tubes to contact the rotor and come off.
-
After centrifugation, bring the CPT tube(s) to a biological safety cabinet and carefully open the tops. Using a 5 ml pipette, gently pipette the plasma up and down against the gel plug to dislodge cells that are stuck to the top of the gel. Avoid vigorous pipetting that would disintegrate the gel plug itself.
-
Transfer the cell suspension from the CPT tube(s) to a 50 ml conical polypropylene tube, pooling the cells from each tube if there are multiple CPT tubes per donor. Add cRPMI to a total of 40 ml.
-
Remove a 10 ml aliquot of cell suspension for counting as per Cell Counting With a Hematocytometer, and Determining Cell Viability With Trypan Blue section, following.
-
Centrifuge 50 ml tubes at 250 × g (approximately 1200 rpm on a Sorvall RT6000 centrifuge) for seven minutes at room temperature.
-
Count cells with hematocytometer while tubes are centrifuging.
-
When centrifugation is complete, aspirate the supernatant and gently flick the tube with a finger to break up the pellet.
-
a) If cells are to be used fresh: Resuspend the cells at 5 × 10⁶ viable lymphocytes per ml in cRPMI. Proceed with functional assay as per protocol. b) If PBMCs are to be cryopreserved: Prepare reagents for cryopreservation in advance. If this is not possible, make sure the cell pellet is disrupted and store the cells on ice until all reagents are prepared. Resuspend the cells as per Cryopreservation of PBMCs section, following.
5.2. Cell counting with a hematocytometer, and determining cell viability with trypan blue
Note: Trypan blue is one of several stains recommended for use in dye exclusion procedures for viable cell counting. This method is based on the principle that live (viable) cells will not take up certain dyes, whereas dead (non-viable) cells will.
-
Mix 10 ul of cell suspension with 10 ul of 0.4% trypan blue. Allow dilution to incubate for three to five minutes at room temperature.
-
Inject 10 ul of the trypan blue/cell mixture beneath the cover slip on a hematocytometer. This volume will ensure that the hematocytometer is not overfilled. Place the hematocytometer on the stage of a binocular microscope and focus on the cells.
-
Count the unstained (viable) and stained (non-viable) cells from the central large square of the hemacytometer. This square should just fill the field of view when using the 10 × lens. If the total cell count is less than 50, count additional large squares until between 50 and 100 cells have been counted.
-
Calculate the total number of viable cells as follows:
Total # viable cells = # viable cells per square × 2 (dilution factor) × 10,000 × total volume cell suspension (in ml)
-
Calculate the percentage of viable cells as follows:
-
Rinse the hemacytometer and cover slide with 70% alcohol, and wipe dry.
5.3. Cryopreservation of PBMCs
The following protocol for freezing PBMCs uses a final concentration of 10% dimethylsulfoxide (DMSO) and 90% protein (human serum albumin). Cryoprotectants, such as DMSO, reduce the amount of ice present during freezing and reduce solute concentration, thus reducing ionic stress. However, these compounds can themselves cause osmotic injury since they are hypertonic and can cause damage during their addition or removal.
-
Resuspend PBMCs (from Isolation section of Processing of Fresh PBMCs, above) at 1 × 10⁷ viable lymphocytes/ml in 4°C of FCS in a 10 ml conical polypropylene tube.
-
While gently swirling the tube, add dropwise enough 4°C 2 × freezing medium (20% DMSO + FCS) to double the volume of the cell suspension.
-
Immediately place the tube on ice. Avoid any further mixing or agitation of the cells. Slowly remove the cell suspension into a pipet and dispense 1 ml per cryovial on ice.
-
Place the cryovials at –80°C keeping air spaces between the vials. Transfer to Liq N2 the next day.
5.4. Day 0: Pre-coating TC plates
-
Precoat 6 well plate (one plate per patient) with hCD3 antibody at 5 ug/mL in PBS (filtered) at 37°C × 2 hrs
-
Remove precoat solution and apply block solution of 2% BSA in PBS (filtered) at 37°C × 30 mins
-
Remove block and wash w PBS × 3
5.5. Thawing of PBMCs
If PBMCs are not thawed properly, viability and cell recovery can be compromised; and cells may not perform optimally in functional assays. In general, cells should be thawed quickly but diluted slowly to remove DMSO. Cells with DMSO intercalated into their membranes are very fragile, and must be pelleted and handled gently.
-
Keep DMEM/IMDM at RT before beginning thawing procedure.
-
Transfer the cryovial from liquid nitrogen to a 37°C water bath. If liquid nitrogen has seeped into the cryovial, loosen the cap slightly to allow the nitrogen to escape during thawing.
-
Hold the cryovial in the surface of the water bath with an occasional gentle “flick” during thawing. Do not leave the cryovial unattended during the thawing process. It is important for cell viability that the cells are thawed and processed quickly; thawing takes only a minute or two. When a small bit of ice remains in the cryovial, transfer the cryovial to the biosafety hood. Dry off the outside of the cryovial and wipe with disinfectant before opening to prevent contamination.
-
Add warm DMEM/IMDM dropwise into the cryovial containing the cell suspension, slowly over a 30 second period. The final volume should be twice the volume of the cell suspension (e.g., add 1 ml cRPMI to a cryovial containing 1 ml cell suspension). Be careful not to exceed the capacity of the cryovial.
-
Transfer the diluted cell suspension to a 15 ml polypropylene centrifuge tube containing 8 ml of warm DMEM/ IMDM for every vial of cells added (multiple cryovials from the same donor may be combined into one 15 or 50 ml tube, if desired).
-
Centrifuge the cells at 1200 rpm (250 G) for five minutes. Aspirate media carefully. If pellet is not clearly defined then do not aspirate completely. Rather, do an additional wash and spin step with wash media
-
Resuspend cell pellet in 0.5–1 mL of LGM media (Lonza Clonetics CC3211) supplemented with 50 ngs/mL IL2 (90 U/ml.; Conversion 1 ug = 1800 IU) and 0.4 ugs/mL CD3 and CD28, + P/S + Glu
-
Remove 10 uL of suspension and dilute 1:10 in 0.1% eosin/Trypan Blue to do cell count. Count all 5 squares.
-
Plate 1.5–5×10⁶ cells/well, 2 mL per well. For cell density >4×10⁶ add a little extra media
5.6. Day 3–7: Monitor T-cell activation & test for mycoplasma
-
Monitor cell morphology: over time cells should transition from small bright round single cells to grape-like clusters. A high concentration of clusters is usually reached around day 5 at which point FACS can be used to monitor activation.
-
Extract ∼300 uL for genomic DNA extraction (use special kit for small cell number). Conduct PCR-based mycoplasma test. Cells must pass mycoplasma test in order to continue to infection.
-
When a high concentration of clusters has been reached, remove aliquot for FACS analysis
5.7. Day 4: Feed cells with 2 mL more LGM media + cytokines
5.8. Day 6: FACS analysis for T-cell activation
-
Harvest 150 uL per cell line into an eppendorf tube. Disaggregate manually w p200, no trypsin needed. Check single cell suspension has been reached by placing a small droplet on a slide and viewing with microscope
-
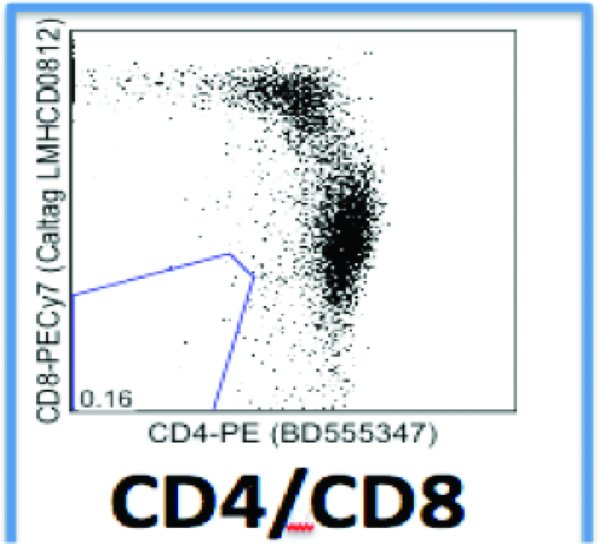
Also harvest 4 additional controls: i) no antibodies ii) anti-CD3 iii) anti-CD4 iv) anti-CD8
-
Take control cells from the well that has the most to spare (highest starting cell number)
-
-
Place each sample into individual wells of a V-bottom 96-well plate
-
Wash w IMDM + 10% FCS two times (spin 2000 rpm × 2 min). Ensure pellet in bottom of plate then simply invert to remove supernatent.
-
Resuspend final pellet in 100 uL media (DMEM with 10% FCS)
-
Add 10 uL per antibody per well (PE Cy7 anti-hCD8; APC anti-hCD4; PERCpCy5.5 anti-hCD3)
-
Incubate in dark on ice 30 mins
-
Add 100 uL wash media per well - wash cells 3 × 2000 rpm × 2 min. Discard supernatant.
-
Resuspend and transfer to FACS tubes. Minimum volume for FACS is 200 uL
-
Set up 4 plots: FSC-A v SSC-A; FSC-A v FSC-W; APC-A v FITC-A; APC-A v PE-A
-
Set up parameters: ballpark values for Canto II machine are as follows:
-
FSC: 253
-
SSC:445
-
FITC:352
-
PE:330
-
PE Cy7: 595
-
APC: 511
-
PERCpCy5.5: 489
-
-
Gate out viable cells - show P1 on FSC-A v SSC-A
-
Show P2 for remaining plots
-
Adjust compensation
-
stop aquisition, click on compensation tab
-
Run CD3 - if anything falls in the wrong quadrant then must adjust tabs
-
Run CD4 as above
-
Run CD8 as above
-
-
Once all quadrants are behaving then run the samples and acquire data. Acquire control, then CD3, CD4, CD8 then all samples.
-
Collect 10,000 events from P2 - ask computer to save all events
-
If CD3 activation is less than <80% then cells need feeding and longer incubation time. Repeat FACS on one well daily in order to monitor
-
Cells were almost 100% positive at this stage (see individual FACS plots). Proceed with infection (= Day 0). The cells below were 100% CD3 positive and represent the population of the cells after the 6 days of activation.
6. Infection
6.1. Day 0: Infection
-
Using Sendai Virus kit avail through Invitrogen “CytoTune Sendai”
-
MOI should be 10:10:10:10 for all for factors.
-
Determine amount of virus to add based on supplied titres and cell count of 500,000, infection volume ∼1 mL
-
Harvest cells - spin 1200 rpm × 5 min, leave 1 mL and resuspend.
-
Cell count
-
Respin and resuspend in 600 uL (use LGM+cytokines media)
-
Place correct amount of cells in 1 well of a 12 well plate (space out evenly) and top up to 600 uL if necessary
-
Thaw virus. Add correct amount of each (∼100 uL) to each well. c-myc had much higher titre therefore added less.
-
Precoat new 6 well plates w hCD3 antibody at 5 ug/mL in PBS (filtered) at 37°C × 2 hrs
-
Plate leftover cells in 6 well for eventual DNA pellet for fingerprinting as well as backup cells freeze down.
6.2. Day 1: Change media
-
Harvest cells and spin 1200 × 5 min
-
Resuspend in 2 mL DMEM + 15% FCS + 1% PenStrep/Glutamine (2 mM)
6.3. Day 4: Change media & plate MEFs
-
Remove 1 mL from the liquid interface of each well
-
Spin to ensure no cells - discard
-
Replace with 1 mL fresh media as per Day 1
-
Plate MEFs ∼2 vials for 8 × 10 cm plates in 8–10 mL. Use one plate per patient
-
Confluency should be around 70% before plating iPS cells. Must be evenly dispersed. This is critical.
6.4. Day 5: Plate iPSCs onto MEFS
-
Cell count - 180 uL eosin + 20 uL cells from each well (gently manually disaggregate twice w a P1000)
-
Label up MEF plates
-
Remove MEF media
-
Transfer infected cells to the MEF plate
-
Add ∼7 mL media, shake gently for 10s back and forth, side to side to mix evenly
6.5. Day 6: Add more media
-
Add 3 mL DMEM + 15% FCS + 1% PSG to iPS cultures
6.6. Day 8: Add more media
-
Add 2 mL DMEM + 15% FCS + 1% PSG to iPS cultures
-
Freeze down excess activated T cells for i) DNA and ii) cell stocks
-
DNA - Harvest 1 mL, spin down, wash once w PBS, respin and remove supernatant. Freeze pellet at −20°C for eventual DNA extraction and fingerprinting
-
Cell stocks - Label up cryovials with patient IDNs. Place at −20°C. Make up freeze media 50:40:10 (IMDM+15% FCS+1% PSG:FCS:DMSO) and place at −20°C to chill. Harvest remainder of cells and spin down in 15 mL Falcons 1200 rpm × 5 mins. Resuspend in freezing media (1 mL per vial). For concentrated cells do 2 or 3 vials. Place immediately in enclosed foam holders and into the −80°C.
-
Use label maker to make labels
-
6.7. Day 9: Replace media
-
Aspirate off current media
-
Replace w 4 mL regular DMEM + 15% FCS + 1% PSG mixed w 4 mL hESC media
-
hESC media as per MSSM website:

Filter media and aliquot into four 125 ml bottles or two 250 ml bottles. Cover with foil and add 20 ng/ml of bFGF i.e. 2 uL/ml of stock bFGF (10 ug/ml).
Ongoing: Monitor colonies and change media as necessary (min every 2 days). When big colonies w neat edges begin to emerge, proceed to isolation of individual clones protocol. Follow similar protocol as described for fibroblasts.
Acknowledgements
This protocol is a modification of the protocol obtained from Laurence Daheron, HSCI Core.
Last revised March 28, 2012. Published June 10, 2012. This chapter should be cited as: Daheron L. and D'Souza S. Blood - SeV derived fibroblast generated iPSCs (June 10, 2012), StemBook, ed. The Stem Cell Research Community, StemBook, doi/10.3824/stembook.1.54.1, https://www.stembook.org.
